If you are done with Photostory # 2 and Project # 2
you can get a head start with next week's PPT# 5
read and summarize ch 3 ( click on the link to read)
https://mcsmphoto.blogspot.com/2015_10_01_archive.html
summarize 2 pages of reading in each slide.
if you prefer to take the Bokeh effect portrait with your phone then you can buy the app
Proshot cam
https://www.cnet.com/g00/products/proshot-ios/review/?i10c.encReferrer=aHR0cHM6Ly93d3cuZ29vZ2xlLmNvbS8%3D
https://www.youtube.com/watch?v=AXi_-NwzyzM
Tuesday, October 31, 2017
Friday, October 27, 2017
MP2: Week# 2: Project (take home Test#2) Bokeh Effect Portraits Due Thursday 11-2-17
10-27-17 Friday: Proposal and procedure for Project # 2
***********************************************************************************************************
Weekend reminder finish up your photostory# 2 with Element of art and design principles (10 pictures in all)
so you can concentrate on your project # 2 next week.
**********************************************************************************************************
if you are still not sure about EXPOSURE Triangle watch these video on ISO control / Aperture control / Shutter speed - and learn to adjust them.
Test Project # 2: Bokeh effect portrait. (soft light portrait with various Depth of field (DoF)
Project #2:
soft light portrait (no flash) with different focal length (18 mm, 35 mm and 55mm)
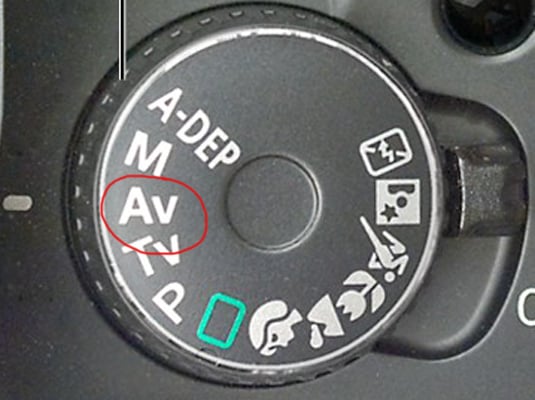
Use the smallest and largest APERTURE possible for these focal length in "Av" mode.
then try to to take a portrait with Bokeh effects by adjusting the setting... you should shoot in "Av" mode. Take your photos at focal length 18, 35, 55 mm.(Flickr # 50 a,b,c)
notice the difference in focal length.
watch Karl Taylor's lesson 5: Natural (soft light) Portrait & understanding-depth-of-field-beginners


Write up for Project # 2: Bokeh effect Portrait Due Thursday 11/2/17
based on your 18mm, 35mm, 55mm portraits (6 pictures)
read and summarize one the articles take the pictures according to the articles too
who is your model(s)? anyone outside of Photography class _____________________
how will you pose your subject? (posing video) take only from chest up "go close"
where will you be taking the photo? Indoor or outdoor
what kind of lighting? __________ reflector needed? Yes or No
what is your DSLR setting? what mode will you be shooting in? ____
how will you set up for each photo? upload to Flickr
# 49- Control ( all clear and focus) aperture =
# 50 a Bokeh at 18 mm aperture=
# 50 b Bokeh at 35 mm aperture=
# 50 c Bokeh at 55 mm aperture=
(move in and out as you adjust the zoom on the lens to keep the subject same size)
#50 d Photoshopped so its your ART piece. goto Edit and use the photo editor.***********************************************************************************************************
Weekend reminder finish up your photostory# 2 with Element of art and design principles (10 pictures in all)
so you can concentrate on your project # 2 next week.
**********************************************************************************************************
if you are still not sure about EXPOSURE Triangle watch these video on ISO control / Aperture control / Shutter speed - and learn to adjust them.
Test Project # 2: Bokeh effect portrait. (soft light portrait with various Depth of field (DoF)
Start on Project # 2 (Test 2) write up printed Due Thursday day 11-2-17
email your proposal of Project # 2 today (if you are not sure what to write watch the video from last week again)Project #2:
soft light portrait (no flash) with different focal length (18 mm, 35 mm and 55mm)
Use the smallest and largest APERTURE possible for these focal length in "Av" mode.
then try to to take a portrait with Bokeh effects by adjusting the setting... you should shoot in "Av" mode. Take your photos at focal length 18, 35, 55 mm.(Flickr # 50 a,b,c)
notice the difference in focal length.
watch Karl Taylor's lesson 5: Natural (soft light) Portrait & understanding-depth-of-field-beginners

Highlights:
1. Choose the bright part as the photography background and significantly blur.
Choose the bright part of the light as the background, to avoid the picture gives a heavy impression. Evergreen plant's color is more concentrated, even if they are virtual, the color is not so beautiful. Shooting background does not have to be plants, you can also choose brightly colored walls.
2. Backlight makes the hair produce high light effect.
The subject's position must be carefully figured out, choose a suitable location, make the hair appear high light, it looks very shiny.The hair once seemed shiny, the expression of the character will give viewers a special impression. If the hair looks black, the whole picture will appear dark, so the photographer needs consciously add high light.
3. Use reflective panels to make the dark face become bright.
The effective use of reflectors can make the dim face become bright and the skin have rich texture. When shooting portraits, in principle, should use the backlight or edge-lit instead of smooth light. Reflectors are outdoor shooting portraits must carry tools.
4. While framing you can crop the arm.
Anyone would like to try to shoot beautiful photography background blur portrait photos. Manufacturing virtual lens elements are aperture size and focal length. These two factors affect each other produce blur effects. Focal length of the lens is certain, the larger the aperture, the more obvious bokeh effect . Fixed aperture value, the longer the focal length, the more obvious the bokeh. From the conclusions, bright maximum aperture and longer focal length telephoto lens can bring the most obvious blur effect.
Review first before taking your pictures Lesson 6 from Karl Taylor
Posing your subject tips!
Karl Taylor's Lesson 5-8
Find a subject (your model) & go to a location with a large area of light, i.e. next to a window. the background should be at least 5 feet away.
Use a reflector to fill in the shadow... take a minimum
of 6 pictures for your write up. Shoot in (A) Aperture mode, let the camera decide the shutter speed for this assignment. start with ISO in 200. (adjust if necessary) Shoot in RAW + JPEG.
refer to blurry bkgd
Good luck and have fun! 
(Wednesday)Finish and upload portrait to Flickr.
( Thursday)
based on your 18mm, 35mm, 55mm portraits (6 pictures)
Explain how this Bokeh effect Portrait is an art work.
Does it contain an element of art? What about its Design principle? (refer to PPT #2)
How did you set up the lighting for this photo-shoot?
What kind of lighting did you use? (refer to PPT # 3)
What kind of lighting did you use? (refer to PPT # 3)
How did you come up with the right setting for this picture?
What was the type of lens used for this project? which focal length was best the Bokeh effect?
What was the type of lens used for this project? which focal length was best the Bokeh effect?
What did you find / learn from this art Project?
What was your experience like working with a live subject?
What was your experience like working with a live subject?
Friday: Share & Print out Photostory# 2: Cityscape


PPT # 5: More on Exposure (Ch 3) next week!
e.c. https://digital-photography-school.com/?s=posesread and summarize one the articles take the pictures according to the articles too
Thursday, October 26, 2017
setting up for project 2
review your DSLR settings
watch Karl Taylor's 2nd half of the video... start at 5:40
watch Karl Taylor's 2nd half of the video... start at 5:40
If it's not working with school computer, then watch it on the phone.
Be able to list and explain the 4 types of lighting use in Photography.
Take 2 photos of your classmate (client) in soft light...
in Av mode... work in group of 3 people... 1-(subject) client, 1 reflector, 1 photographer.


upload to Flickr
# 47 -without reflector, # 48 with reflector
write your observation in the Flickr description box.
share your Flickr photos with me and your client too =)
Thursday, October 19, 2017
Marking Period 2: PPT#4 lens due 10-25-17
Homework: if you want to get a head start on the next project...
Bokeh effect portrait click here for TEST project # 2.
Powerpoint 4: Camera Lens should include the following...
add examples pictures over weekend print out by MondayBokeh effect portrait click here for TEST project # 2.
Powerpoint 4: Camera Lens should include the following...
note: zoom vs. telephoto lens
Share Daily of your online research progress on Google slides...
Day 1: October 19 (Cite your sources and write in your own words!)
slide 1:Lens Focal length (the basic difference between lenses)
slide 2: Normal Focal Length (the most like human vision) add flickr photo with EXIF
slide 3: Long Focal Length (telephoto lenses) add flickr photo with EXIF
slide 4: Short Focal Length (Wide-angle lenses) add flickr photo with EXIF
Day 2: October 20
slide 5: Automatic / Manual Focus
slide 6: Focus and Depth of Field (Dof) Know this well for Project #2
slide 7: Depth of Field (controlling sharpness in a Photograph) how Focal length affect Dof
weekend assignment: Photostory # 2: Cityscape ( at least 5 pictures taken with DSLR) Flickr# 31-40 (just like PS#1 Incorporate element of Art and principles of Design)
Day 3:October 23
slide 8: Zoom, Macro, and Fisheye Lenses
slide 9: Perspective: How a photograph shows depth
slide 10: Lens attachments (close up and filters)
Day 4: Oct 24
Write up: Exposure triangle:

slide #11
with Class exercise:
Given the following scenarios, what are the appropriate settings for focal length, aperture, shutter speed and ISO? Lens used?
1) Beautiful sunny day and you want to take sharp image of a building from a close distance.
ISO= Shutter Speed = Aperture= Lens (Focal length)=
2) At a birthday party with candle lights only and you’re taking a picture of the cake
ISO= Shutter Speed = Aperture= Lens (Focal length)=
3) Early Morning, sun is not up yet and you’re taking a picture of the beach and you want everything to be in focus.
ISO= Shutter Speed = Aperture= Lens (Focal length)=
4) You’re taking a picture of your significant other in a crowded place in the afternoon at 5:30PM near Times Square. You only want your subject to be in focus and everything else to be blurry.
ISO= Shutter Speed= Aperture= Lens (Focal length)=
5) You’re taking a picture of a Lamborghini in a racetrack with overcast daylight but want to give motion blur to everything else but the car.
ISO= Shutter Speed = Aperture= Lens (Focal length)=
6) You’re taking a picture of a ninja during broad daylight (assume ninjas are fast!)
ISO= Shutter Speed = Aperture= Lens (Focal length)=
7) You’re in your corner office on the 10th floor and you are taking a picture of your friend that works on the 10th floor in a neighboring building during broad daylight at 12:00PM.
ISO= Shutter Speed = Aperture= Lens (Focal length)=
************************************************************************************
Day 5: Oct 25 (worksheet)
slide #12
(Practice for the Projects). upload to Flickr with labels and description
Write up: Exposure triangle: Defined with examples Taken with DSLR
Flickr # 41-42 (A (av) mode) Picture with Small aperture & Large Aperture (Dof)
Flickr # 43-44(S (tv)mode) Picture with Fast shutter Speed & Slow shutter Speed (motion).
Flickr # 45-46 (M mode) Picture with Low ISO and High ISO (image quality)
(write up on the observation of your practice shots).
add Qr code to your write up and print out.
Wednesday, October 18, 2017
Flickr album: Mp1
please edit the label as follows....
Flickr check list:
# 16 - # 25 PS#1: Food - what you are demonstrating in your photo? see # 4-15
# 26 to # 29 is the 4 types of light according to Karl Taylor the guy from the video.
# 30 a,b Monday's Exam for MP1
Flickr check list:
#1: Selfie
What camera did you use to take it?
#2: Best Photo so far
what makes it a good photo?
#3: Diagram of the DSLR camera.
Canon Rebel T-6
**************************************************************************************
Powerpoint # 2 (just copy and paste for the title)
then add description too.
**************************************************************************************
Powerpoint # 2 (just copy and paste for the title)
then add description too.
#4: Leading Lines - Element of Art
#5: Shapes / form - Element of Art
#6: Space - Element of Art
#7: Value - Element of Art
#8: Texture - Element of Art
#9: Color - Element of Art
#10: Emphasis - Principles of Design
#11: Visual Balance - Principles of Design
#12: Unity - Principles of Design
#13: Contrast - Principles of Design
#14: Movement/Rhythm - Principles of Design
#15: Pattern/Repetition - Principles of Design# 16 - # 25 PS#1: Food - what you are demonstrating in your photo? see # 4-15
# 26 to # 29 is the 4 types of light according to Karl Taylor the guy from the video.
# 30 a,b Monday's Exam for MP1
Tuesday, October 17, 2017
Test Part 2
goto Pupil path ---> Assignment ---> Digital Photography and download the template for the write up.
https://pupilpath.skedula.com/assignments/attachment/?FileID=1815
upload this to your google drive (file---> upload)
then change the subject line and then the pictures and QR code...
then share and print out your personalized test paper.
answer the rest of the questions by hand. Due at the end of the period.
Monday, October 16, 2017
Mp1 Test: shooting in Manual mode... Part 1
send 2 leaders from each table to pick up the camera T-6 or T-5. You will be the one to return the camera at the end of the test... so make sure you let the other 2 classmate go first each student will have 5 to 10 minutes to complete taking the picture.
first thing first take out your SD card ... then check the lens to see if its in MF mode not AF.

.
 In Aperture Mode : Adjust the f-stop to F/8.0 for (odd#)F/6.3 (even#)
first thing first take out your SD card ... then check the lens to see if its in MF mode not

.
For this TEST project you have to shoot your " art piece" in Manual mode only.
set the camera in the following setting!
In Quick Menu: set the image quality to RAW (CR2) + L and the ISO to 200 (light sensitivity) for odd computer #
ISO 400 (light sensitivity) for even computer #.
ISO 400 (light sensitivity) for even computer #.
 In Aperture Mode : Adjust the f-stop to F/8.0 for (odd#)F/6.3 (even#)
In Shutter Speed Mode: Adjust the shutter speed or exposure to 1/80 sec (odd#) 1/200 sec for (even#)
Take one in this setting. if the picture comes out too bright or too dark. you may NEED to make some adjustments to obtain a properly exposed photo without flash.
Upload JPG to Google Photo album as pic #30a,30b
#30a: Test default setting - what is wrong with it?
#30b: corrected setting - what did you adjust?
#30a: Test default setting - what is wrong with it?
#30b: corrected setting - what did you adjust?
***************Google share .CR2 first as Part 1***********
email with the subject line:
AJS11-0__ Your name MP1 test
Body is the google photo links + the link to your google share file
****************************************************************************************************************************
HW/Part 2 tomorrow: Q & A about your photo lab test
Subscribe to:
Posts (Atom)