Monday, November 5, 2018

Mp2 wk4: Project # 3: iso bracketing and white balance (WB)

Monday: Turn in PPT# 5 share and print.

Project # 3: ISO bracketing in different lights (WB)
Monday: ISO bracketing (#51) taking a picture at each ISO setting until you find the good one!
upload as # 51 in Google photo album (label and add description) share.
Tuesday: Election Day
Wednesday: White Balance (WB) video
 
read https://expertphotography.com/4-steps-to-understanding-white-balance/
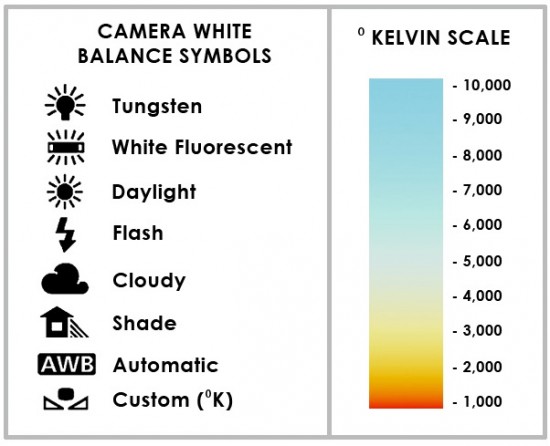
Wed: demonstrate visual balance, or unity ( more than one subject) under different light. (color white must be present for White balance).

See the source image     See the source image
 See the source image                       
See the source image


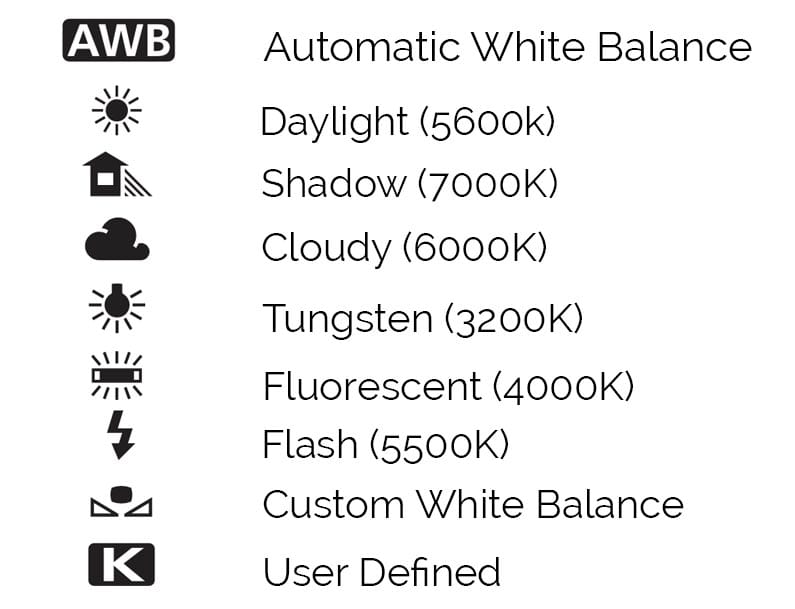
#52 (AWB), 53 ( incandescent / Tungsten : 3200K)

This Art work needs to demonstrate either visual balance, unity or contrast.

#54 (AWB), #55 (fluorescent : 4000K)
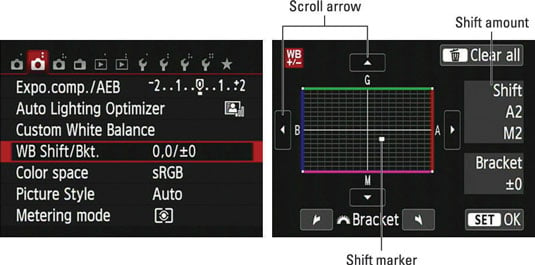
                 #55b adjusted WB shift (E.C.)


Project 3 (mini Test 2 out of 3)
Write up: 
1.How did you create this artwork ( element or Composition wise )?
2.what lighting did you use? 
3.how did it affect the appearance of "white" in your artwork?
4.How did you determined the correct exposure? (ISO bracketing)
5.what problems did you encountered? (Photo # 55 -too much correction?) 
5b.how did you solve it?

6.what did you learn from this Project?
Monday, October 29, 2018

Week # 3: Submit Test # 2 (Bokeh Effect Project) & PPT #5 light and exposure

*** For 10-30-18 attendance... SHARE your PPT# 5 google slide*** plus 2nd period - reading period reading material - CH 3

Students with the DSLR... hold the camera for another day to do your Photostory # 2:City scape due Thursday
we are 1/2 way done with the semester!

PPT# 5: Light and Exposure (10 slides) Due Nov 2,2018


 read and summarize ch 3 ( click on the link to read)
https://mcsmphoto.blogspot.com/2015_10_01_archive.html
summarize 2 pages/topics of reading in each slide.

  ><- replaces SD card

Tuesday:Read 51-55 & summarize on Powerpoint. (Google slide shared)        
             slide 1: cover page (change SD card to textbook cover)
             slide 2: Exposure triangle diagram + intro pg 51
             slide 3: Pg 52-53
             slide 4: pg 54-55   

Wednesday: Pg 56-61 Boo! its Halloween
            slide 5: pg 56-57
            slide 6: pg 58-61

Thursday: pg 62-65 (PS # 2: City- scape HW due)
             slide 7: pg 62-63
             slide 8: pg 64-65

Friday: pg 66-71 add google photos
             slide 9: pg 66-68
            slide 10: pg 69-71  
                                                   Due:  share  
Next Monday: add ISO bracketing to slide # 11 then print!


***************************************************************************************

(start on Project # 3: ISO bracketing)
then Quiz on PPT# 4 & 5 (ch 2 & 3) next week...


****************************************************************************************


Project 2 correction

if your portrait background is NOT blurry...
then you need additional practice.
Try taking a series of a still life with the following f-stops.

f/5.6, f/6.3, f/8, f/11, f/16, f/22 in 55mm

this will be your aperture bracketing set. (click to enlarge photo)

Sunday, October 28, 2018

need another SD card?

https://www.spoofee.com/samsung-32gb-evo-select-microsd-memory-card/deals/926391

Samsung 32GB EVO Select microSD Memory Card for $6.99

Posted: 10/23/18 05:06 am ( 5 days ago )
star rating   Rated 4 / 5 Based on 1 Review
Sophia Davis
By 
Spoofee.com!
Samsung 32GB EVO Select microSD Memory Card
Amazon is offering the Samsung 32GB 95MB/s (U1) MicroSD EVO Select Memory Card with Adapter (MB-ME32GA/AM) for the best deal.

Next best price on Google is $14.99

Amazon Price is $6.99

Purchase a total of $25 worth of goods to get it shipped
check out Selfllery another photo community that earns cyber coins for charity.
https://selfllery.com/?ref=92cc1681

Wednesday, October 24, 2018

Proposal and procedure for Project # 2

e.c. portrait Poses  choose an article that will help you with the project and submit summary with write up for Project # 2: Bokeh Portraits

email
subject: Proposal and procedure for Project # 2

read about Bokeh and plan for your Project # 2: Soft light Bokeh Portrait to be shot in AV mode.


                   AIM:Which Focal length produces the best Bokeh effect?           

who is your model(s)? anybody outside of Photography class _____________________
how will you pose your subject? (posing video) take only from chest up "go close" and the background should be at least 5 feet away.
where will you be taking the photo? Indoor or outdoor
what kind of lighting? __________ reflector needed? Yes or No
what is your DSLR setting? what mode will you be shooting in? ____
how will you set up for each photo? upload to google photo album MP2 
# 49abc- Control ( all clear and focus) aperture = ( take at 3 focal lengths)
# 50 a Bokeh at 18 mm aperture=
# 50 b Bokeh at 35 mm aperture=
# 50 c Bokeh at 55 mm aperture=
(move in and out as you adjust the zoom on the lens to keep the subject same size)
#50 d Photoshopped  so its your ART piece. goto Edit and use the photo editor.
************************************************************************************* 
Thursday & Friday:

Project # 2 write up...in Google doc
Write up for Project # 2: Bokeh  effect Portrait  Due Monday 10/29/18 printed

based on your 18mm, 35mm, 55mm portraits (6 pictures)
1.Explain how this Bokeh effect Portrait is an art work. What is the message here?
2.Does it contain an element of art? What about its Design principle? (refer to PPT #2)
3.How did you set up the lighting for this photo-shoot?
4.What kind of lighting did you use? (refer to PPT # 3)
5.How did you come up with the right setting for this picture? 
6.What was the type of lens used for this project? which focal length was best the Bokeh effect?
7.What did you find / learn from this art Project? 
8.What was your experience like working with a live subject?


if you are having trouble with this project, finish the photostory first and exchange the Nov1 due date with project # 2.


Monday, October 22, 2018

(Mp2 wk#2) PPT # 4 & Project # 2: Soft light Bokeh Portrait

Finish up PPT# 4: Camera Lens (internet research and citation).
Monday-
Do Now: Transfer Exposure triangle worksheet write up + 2 more slides then print.

************************************************************
Weekend HW: Landscape of the city or 'Cityscape' same Rubric as the food story - Elements of Art & Principles of design. (10 pictures) Due Nov 1, 2018
upload to Google photo album MP2 # 31-40
************************************************************

Day 3: Oct 22, 2016
slide 8:Depth of Field (controlling sharpness in a Photograph) how Focal length affect Dof 
slide 9: More about Depth of Field (how to preview and setting it up to the desired f-stop) 
slide 10: Perspective: How a photograph shows depth 
slide 11: Lens attachments (close up and filters)
Slide 12: exposure triangle practice shots (google photo # 41-46)
Slide 13: exposure triangle worksheet
*******************************************************  Print out ***********************

Tuesday - Friday
read about Bokeh and plan for your Project # 2: Soft light Bokeh Portrait to be shot in AV mode.
      Tues: Video then take 2 pictures... #47 without reflector & # 48 With reflector
      Wed: upload and label with descriptions. Read and plan for Bokeh portraits, take photos.
      Thurs: finish taking photos upload # 49 a,b,c small aperture + # 50 a,b,c large aperture & write up on google .doc
      Friday: finish write up & print out!


Thursday, October 18, 2018

Wk 1: 2nd Marking Period: PPT #4: Camera Lenses

screen shot or take a selfie of you working on ppt#4 send in for attendance. 


We learned about how to adjust the setting on the DSLR body to control exposures...
Now we will now learn about the Lenses to see how we can control the Depth of Field (Dof).

Powerpoint 4: Camera Lens should include the following...
add examples pictures over weekend print out by Monday
Share Daily of your online research progress on Google slides...
 Cover slide                                                                 
Day 1: Oct 18, 2016 (Cite your sources and write in your own words!)
slide 1:Lens Focal length (the basic difference between lenses) + diagram
slide 2: Normal Focal Length (the most like human vision) 
            + 500px.com photo stating its focal length (on the right click on detail to see the setting) 
slide 3: Long Focal Length (telephoto lenses) + 500px.com photo stating its focal length (on the right click on detail to see the setting) 
slide 4: Short Focal Length (Wide-angle lenses) + 500px.com photo stating its focal length (on the right click on detail to see the setting) 
Day 2: Oct 19, 2016
slide 5: Zoom, Macro, and Fisheye Lenses (Add photos, price, picture of the lens)
slide 6: Focus and Depth of Field (Dof)
slide 7: Automatic Focus vs. Manual Focus 
************************************************************
Weekend HW: Landscape of the city or 'Cityscape' same Rubric as the food story - Elements of Art & Principles of design. (10 pictures)
upload to Google photo album MP2 # 31-40
************************************************************