Tuesday, March 23, 2021

Project Test # 2: Bokeh Portrait


Week #3: Project # 2: Bokeh effect portraits

3-23-21 Tuesday  Soft light portraits with or without reflector       

Video intro Watch from 5:45 to the end         https://youtu.be/u9prcUCHlqM?t=5m45s

take 2 pictures.... (reflector can be anything that REDIRECTs light).
send/share in Google Photo 

Google Photo # 37 without reflector & your observation
Google Photo # 38 with reflector & your observation

due at the end of the period. (email: AJS11-02 Your name Reflector photos) send video reviews & photo links.
***************************************************************************************
read Bokeh  for background
******************************************************************************************************
MP2: Week# 2: Project (take home Test#2) 
Bokeh Effect Portraits Due Thursday 3-25-21
3-24-21 Wednesday: Proposal and procedure for Project # 2
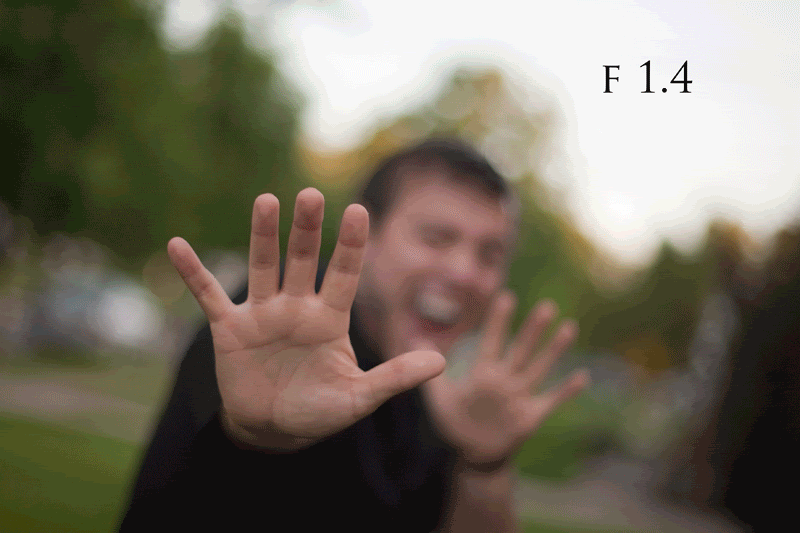
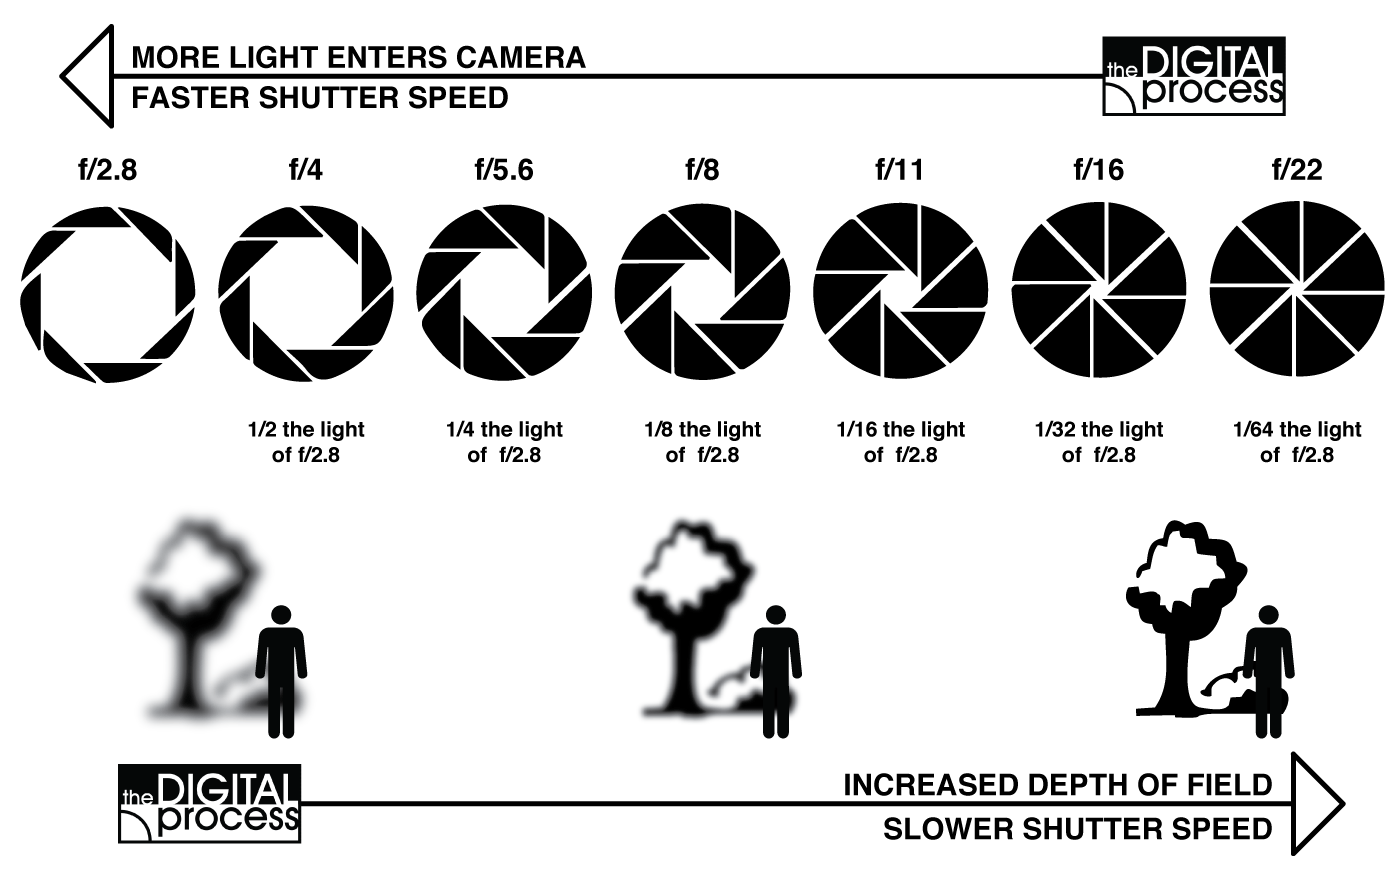
                   AIM:Which Focal length produces the best Bokeh effect?           

1.who is your model(s)? anybody outside of Photography class _____________________
2.how will you pose your subject? (posing video) take only from chest up "go close" and the background should be at least 6 feet away.
3.where will you be taking the photo? Indoor or outdoor
4.what kind of lighting? __________ reflector needed? Yes or No
5.what is your DSLR setting? what mode will you be shooting in? ____
6.how will you set up for each photo? upload to Google Photo
# 39abc- Control ( all clear and focus) aperture = f/ _____  ( take at 3 focal lengths)
# 40 a Bokeh at 18 mm max aperture= F/ __
# 40 b Bokeh at 35 mm max aperture= F/ __      Common F-stop = _______
# 40 c Bokeh at 55 mm max aperture= F/ __
(move in and out as you adjust the zoom on the lens to keep the subject same size)
#40 d Photoshopped  so its your ART piece. goto Edit and use the photo editor.
Extra credit: https://i.gifer.com/QI10.gif


https://gifer.com/en/QI10
read this before shooting your project https://www.bhphotovideo.com/explora/photography/tips-and-solutions/seven-tips-every-beginning-portrait-photographer-should-know

Project # 2 write up...in Google doc
Write up for Project # 2: Bokeh  effect Portrait  Due Friday 3/25/21 remember to submit
based on your 18mm, 35mm, 55mm portraits (6 pictures) from yesterday.
AJS11-0__ Your name Project/Test # 2: Bokeh Portraits (SHARE google doc)
add QR code
Album link
add the  6 photos with EXIF
EXIF = ISO, F-stop, Shutter speed and focal length
Q & A
1.Explain how this Bokeh effect Portrait is an art work. What is the message here?
2.Does it contain an element of art? What about its Design principle? (refer to PPT #2)

3.How did you set up the lighting for this photo-shoot?
4.What kind of lighting did you use? (refer to PPT # 3)

5.How did you come up with the right setting for this picture? (the exit slip)
6.What was the type of lens used for this project? which focal length was best the Bokeh effect?


7.What did you find / learn from this art Project? 
8.What was your experience like working with a live subject?


extra credit: Aperture bracketing.

Tuesday, March 16, 2021

MP2- PPT# 4 : Camera Lens (Optics)

 3/16/2021

Powerpoint 4: Camera Lens should include the following...
Due by Monday 3-22-2021
Share Daily of your online research progress on Google slides...
Tuesday  QR code   Cover slide                                                             
Day 1: Mar 16 (Cite your sources)
slide 1:Lens Focal length (the basic difference between lenses)
slide 2: Normal Focal Length (the most like human vision) add 500px.com photo with EXIF
             Long Focal Length (telephoto lenses) add 500px.com photo with EXIF
             Short Focal Length (Wide-angle lenses) add 500px.com photo with EXIF
EXIF = ISO, F-stop, Shutter speed and focal length

Day 2: Mar 17
slide 3: Aperture is... watch Video & review


            or Android phone find an app that allows you to control your aperture setting.


slide 4: Focus and Depth of Field (Dof) Know this well for Project #2(watch the video 1:53)
   video  and take one with DSLR for practice with your classmate as the subject.
how to set it up on the DSLR in Mode AV ( get close to your subject).
aperture bracketing: shoot in f-stop 5.6 - f/11-f/22 at 55mm
iPhone ---> https://support.apple.com/en-us/HT208118

Google photo #31- large aperture with small f-stop, 32- small aperture with large f-stop.

slide 5: Depth of Field (controlling sharpness in a Photograph) increasing focal length
            watch video how Focal length affect Dof. (watch the video 3:13)
             Keep the aperture the same but change the focal length....
             still in AV mode. keep your f-stop at f/5.6 but shoot in the 
                                        following focal length,    18mm,35mm and 55mm 
                                                                            or iPhone .5, 1x,2x camera with f/1.4

Day 3:Mar 18 - raining day
slide 6: Zoom, Macro, and Fisheye Lenses add picture of the lens, sample pictures taken by these lens and the prices too.
slide 7: Automatic / Manual Focus (video ) how do you focus under different settings?
          &Lens attachments (filters and hood)
due date Mar 22, 2021.
Day 4: Mar 19
 ADD Exposure triangle worksheet with practice shots
slide 8: practice shots with worksheet
3/22/21 -take photos to complete and submit.
#31-32 Aperture set on slide 5 
#33-34 Shutter Speed set
Create The Long Exposure
Go to the Photos app and open up one of your Live Photos. Swipe up, then swipe to the right under the “Effects” header. “Long Exposure” is the last option (the others are “Live,” “Loop,” and “Bounce”). Tap “Long Exposure” and watch what happens!

#35-36 ISO (exposure) set
           Can you set exposure on iPhone?
In the built-in Camera app, start by tapping to set focus. Then simply swipe up or down to adjust exposure (brightness). Swipe up to make the image brighter, or down to make it darker. When the brightness levels look good, tap the shutter button to take a photo.


 EC#1: try taking the 7 photos with your own answers. 

Exit slip - which setting makes the background blurry ? (explain in terms of Dof)


Weekend assignment- City Landscape with ART elements & principles of designs.  due Monday.

Thursday, March 11, 2021

End of Mp1 check list:


MP1 report card packet

... To end the Marking Period today.

we will be finalizing your Photo album (art portfolio)

then we will send email links from your work for the report card.
with the subject

AJS11-0__ Your name MP1 Report card links
1. PPT#1 - Different types of Camera
2. PPT#2 - Photography is Art
3. PPT#3 - Photography Lighting
4. Food Story remember to have a classmate evaluate it
5.Google Photo album link (fully labeled and described)


Update your Google Photo album   due 3-14-21
sample album: updated by Loren

#1: Selfie: What camera did you use to take it?
#2: Best Photo so far
      what makes it a good photo? with 2 comments
#3: Diagram of the DSLR camera. 
      Canon Rebel T-6
********************************************************************************* cc*****
Powerpoint # 2 (just copy and paste for the title) then add description/explanation.

#4: Lines - Element of Art
#5: shapes / form - Element of Art
#6: space - Element of Art
#7: value - Element of Art
#8: Texture - Element of Art
#9: color - Element of Art

#10: Emphasis - Principles of Design
#11: Visual Balance - Principles of Design
#12: unity - Principles of Design
#13: contrast - Principles of Design
#14: Movement/Rhythm - Principles of Design
#15: Pattern/Repetition - Principles of Design

# 16 to # 25 Food pictures taken with element of art and composition. Food story

Powerpoint # 3 (Manual Mode)
# 26: hard light
# 27: soft light
# 28: transmitted light
# 29: Reflective light
**************************
Test# 1 - Value of light...
# 30a - even light
# 30b - spot light

# 30c - extra credit - "photoshopped" look or adjusted Black and white.

Wednesday, March 10, 2021

MP1 Test part 1: Value of light

IF you have a DSLR - try the yellow or blue setting.

 In Aperture Mode : Adjust the f-stop to F/7.1 for (odd#)F/20 (even#)

In Shutter Speed Mode: Adjust the shutter speed or exposure to 1/200 sec(odd#) 1/125 sec for (even#)

Take one in this setting. if the picture comes out too bright or too dark. you may NEED to make some adjustments to obtain a properly exposed photo without flash.

Upload JPG to Google photo album as pic #30a,30b

#30a: Test default setting - even lighting
#30b: corrected setting - spot lighting

Origami crane with shadow....
for DSLR only *****Google drive & share Fixed.CR2 first as Part 1*****

email with the subject line:
AJS11-0__ Your name MP1 test
Body is the google photo album link + the link to your google share file
then attach 30 a & 30 b

EXIF - exposure triangle worksheet

  https://youtu.be/l_oL0nYqps0


worksheet:                                                                                               Ajs11-0__ Name: _____________________
with Class exercise:

Given the following scenarios, what are the appropriate settings for focal length, aperture, shutter speed and ISO? Lens used the 18-55mm on Canon T-6. Try out your settings too.


        1) Beautiful sunny day and you want to take a sharp image of a building from a close distance.

         ISO=           Shutter Speed =           Aperture=            Lens (Focal length)=


2) At a birthday party with candle lights only and you’re taking a picture of the cake 

          ISO=           Shutter Speed =                      Aperture=            Lens (Focal length)=


3) Early Morning, sun is not up yet and you’re taking a picture of the beach and you want everything to be in focus.   

           ISO=           Shutter Speed =         Aperture=       Lens (Focal length)=


4) You’re taking a picture of your significant other in a crowded place in the afternoon at 5:30PM near Times Square. You only want your subject to be in focus and everything else to be blurry.    

            ISO=            Shutter Speed=                    Aperture=       Lens (Focal length)=


5) You’re taking a picture of a Lamborghini in a racetrack with overcast daylight but want to give motion blur to everything else but the car.   

   ISO=        Shutter Speed =                      Aperture=          Lens (Focal length)=


6) You’re taking a picture of a ninja during broad daylight (assume ninjas are fast!)

             ISO=             Shutter Speed =             Aperture=       Lens (Focal length)=


7) You’re in your corner office on the 10th floor and you are taking a picture of your friend that works on the 10th floor in a neighboring building during broad daylight at 12:00PM.

           ISO=         Shutter Speed =           Aperture=      Lens (Focal length)=

Tuesday, March 2, 2021

PPT # 3: Photography lighting Due 3/5/2021

PPT # 3: Photography Lighting due Wednesday March 5 2021

update your album to picture # 29 over the weekend... photo check list link
Tuesday:
slide 1: PPT# 3: Photography lighting controls Cover page

Slide 2: Video review 
Intro Video review..https://www.youtube.com/watch?v=u9prcUCHlqM
Watch video and add review  to this slide # 2

more detailed click -->https://goo.gl/images/AqdB6v
Slide # 3:
There are 6 essential components to Photography:

Define the following.
1. Light
2. Medium
3. Aperture
4. Shutter Speed
5. Composition
6. Optics

**************************************************
Wednesday: 4 types of lighting and 500px.com examples....
Find 3 examples for each types of Lighting (12 pictures in all)
slide 4= Hard light 3+1 of your own (#26)
slide 5= soft light 3+1 of your own (#27)
slide 6= transmitted light 3+1 of your own (#28)
slide 7= reflected light 3+1 of your own (#29)
*************************************************
Thurs: Take a sample picture for each type and upload to Google Photo album. Photo # 26,27,28,29
HW: Click on the orange links...
if you are still not sure about EXPOSURE Triangle watch these video on ISO control / Aperture control / Shutter speed - and learn to adjust them.
**************************************************************
Friday: How to adjust my DSLR ( read the manual) then Share and print (PPT # 3 due)
** Diagram on DSLR works https://goo.gl/images/xeiRNT
Slide 8: Quick "Q" button on the Menu adjustment "how to change the exposure"
            write out the steps on how you can adjust the menu to change the exposure.