Tuesday, November 30, 2021

Quiz # 2A on Edmodo.com

 Do now: sign up on Edmodo.com to take the Quiz 2 A on PPT# 4

join class - code guxrhn https://new.edmodo.com/joincg/guxrhn


Classwork: review PPT# 4 and take Quiz (25 min) 8:50 to 9:15


Hw: finish update your photo album due tonight. # 31-60
submit by attaching album link 

Monday, November 29, 2021

Last week of MP2: Project 4, and Quizzes on PPT# 4 & 5

 Do now: upload and update Project 4 photos to your google photo album - share your link to mcsmphoto@gmail.com

Class work

Editing your shutter speed artwork (light painting) in google photo album -\ tap Edit Edit and toggle side bar to see editing selection. Focus on darkening the background- so the light stands out - isolating the light trail. save your edit.

  1. Open the photo you want to edit.
  2. Tap Edit Edit and then Adjust.
  3. Select the type of effect you want to apply to your photo and move the dial to make changes.
  4. When you finish, tap Done.
  5. To undo an effect, deselect the option or tap Cancel.

for #60 repeat edit procedures - but this time save a copy for # 60. so you can see both before and after photos.

Learn more ways to adjust photos

Important: Some features might not be available on your device.
  • Tap Depth  to adjust what depths of your photo are blurred instead of in focus.
  • Tap Brightness  to adjust the overall lightness or darkness.
  • Tap Contrast  to adjust the difference in tones.
  • Tap White point  to adjust the brightest value.
  • Tap Black point  to adjust the darkest value.
  • Tap Highlights  to adjust the detail in the brightest areas.
  • Tap Shadows  to adjust the detail in the darkest areas.
  • Tap Saturation  to adjust the intensity of colors.
  • Tap Warmth  to adjust the color temperature.
  • Tap Tint  to adjust the hue.
  • Tap Skin tone  to adjust the saturation of the skin-colored tones.
  • Tap Blue tone  to adjust the saturation of the blue tones, like sky or water.
  • Tap Pop  to adjust the local contrast of edges.
  • Tap Sharpen  to sharpen fine details.
  • Tap Denoise  to smooth out noise.
  • Tap Vignette  to reduce the brightness around the edges of the photo.
  • Tap HDR  to enhance brightness and contrast across the image for a more balanced photo. 

work on the write up for Project 4 based on your photos for submission by the end of the period. Print out as exit slip.

what shutter speed for this photo? fast or slow? 


HW: Review for Quiz 2A on PPT# 4 tomorrow. & Quiz 2B on PPT# 5 Wednesday.

Wednesday, November 24, 2021

Project 4: Effect of various Shutter speed & grading Project # 3


    Do now: email your project 4 proposal to mcsmphoto@gmail.com
    what kind of art project will you be making this Thanksgiving?
    take a fast vs. slow shutter speed art work (photo# 58 -no app& 59 with app)
    Did you download slow shutter fast cam app to your phone? Android download Long exposure 2 or Lightroom.

    Classwork:
    Peer grade: Project # 3 pls submit by the end of the period.

    Due Nov 29, 2021
    • Effects of various Shutter Speed... Go outside of school (NY City Scape) Get out there! safely with Mask on.

      What setting would you use for this picture?
      Taken by former student - Nicholas 
    • if its going to be day time find a water fountain...
      live photo
      swipe up  in iPhone


       Long exposure

    • Google photo picture # 58-60
      #58 - fast shutter speed
      #59- slower shutter speed
      #60 Photo edit version
    • Monday 11-29-21
    • Project #4: Effect of Various Shutter Speed Write up... 
    • pre-project preparation: Add Photo# 56 & # 57 and explain why you chose one over the other for your project.
    • #1: Explain how you derived your camera setting for this project? app used. (what was the lighting condition like?)
    • #2:How did the camera captured the motion? (shutter speed used, etc).
    • #3:What did you do for your post-editting? List them
    • #4:How is your photo an artwork? (also include composition).

light painting ideas:  https://youtu.be/GSyEx4b4cyQ

Tuesday, November 23, 2021

Practice for project 4 - day 2 night version...

 Do now: share your picture # 56 LINK by replying to yesterday's email you sent to mcsmphoto@gmail.com 

Classwork: Night time shutter speed photography with  Light trail painting ...

for light painting practice...
still TV mode but start with 1 second, add more time if needed - might need tripod.
light paint your name or initial (picture #57https://youtu.be/j51kkw3ArM8
going further Light portraits
or make Physiogram for extra credit.

HW: download slow shutter fast cam app 

Thanksgiving : Project / Test # 4 Write up:


or draw out these shapes for extra credit

Monday, November 22, 2021

MP2 week#5: effect of various shutter speed (project/test # 4)

 Do now: did you print & submit your test # 3?

                 email your answer as exit slip: what are the effects of various shutter speed?

                 mcsmphoto@gmail.com Ajs11-0_ your name effect of shutter speed


Classwork: Take pictures of various shutter speed (Shutter speed bracketing) and make a collage of all the pictures as picture # 56 with observation. 

upload & share from your google photo album. 

                           DSLR mode = Tv for shutter speed priority.

Practice for Project # 4: effect of various shutter speed

Monday: Practice how to capture motion with Shutter Speed bracketing picture# 56 Upload & share!
***********************************************************************************
Remote students
install LIGHTROOM - https://apps.apple.com/us/app/adobe-lightroom-photo-editor/id878783582
goto professional (PRO) cam and choose the following shutter speed (see below)

alternative:
iPhone app Slow shutter fast cam
https://apps.apple.com/us/app/slow-shutter-fast-cam/id730352755#?platform=iphone

Take in the following increments... 0.5, 1,2,4,8 seconds


Light painting tomorrow... look for an additional 'Flash light" to draw your art work in mid air.

HW: update food diary for Wednesday's peer evaluation.

Friday, November 19, 2021

project# 3- write up Q&A

 Do now: share your pictures links from your MP2 album. Making sure that each photos are numbered, title and described.

Class work: Google doc in google classroom.

Watch the video for additional help on White balance.


Answer the Q & A on Project # 3 and print out by the end of the period.

HW: catch up or redo photos in your album worth 1/3 or your report card grade.

Album check list-
entire album due 11/30/21 (Number, label and described)

**************************************************************
#31-40  Photostory # 2:Food Diary (HW assignment) Due Nov 5, 2021
***************************************************************************************
#41-42 Exposure triangle: Aperture set -(phone=f/1.8 vs f/16) DSLR f/5.6 vs f/22

#43 Reflecting lights - no reflector - follow the video https://youtu.be/u9prcUCHlqM?t=5m45s
#44 Reflecting lights - with reflector

#45 a,b,c - Project test # 2 control (f/22)                                  AV mode or Focos app / Portrait mode
#46 a,b,c - 18mm, 35mm, 55mm (f/5.6) Bokeh

#47-48 Exposure triangle: Shutter Speed set  fast vs. slow
#49-50 Exposure triangle: ISO set under vs over exposure

# 51- ISO bracketing Due: Nov 16 2021                                    M Mode or Focos app / exposure compensation

# 52-55 project #3:White balance by 11-19-21                           LIGHTROOM app to make your phone like DSLR

# 56 - shutter speed bracketing 11/22/21                           TV mode or Slow shutter fast cam app/ Live mode

# 57 - light painting 11/23/21

# 58- Project test # 4: fast shutter speed 11/24/21

# 59 - Project test # 4: slow shutter speed
# 60 - Photoshop of 59

Thursday, November 18, 2021

Project # 3: White balance- which is the best?

 do now: set up your artwork at your station and take a picture with your phone. send to mcsmphoto@gmail.com Subject: Ajs11-0__ Your name - my artwork for project#3 is

Classwork: Proceed to " balance your 2 items in your presentation by placing them either symmetrically or asymmetrically as you are the artist." what will be your message for your art pieces?

HW: update your album with the pictures taken today with labels.


Project # 3/test on White balance

 Balancing both design and lighting:


Use Focos app for WB function


Project # 3:

take 2 or more items (making sure 1 of them has white color)

place them so the composition is balanced.

then under different types of lighting we will "test" the correct WHITE Balance (WB)

 demonstrate visual balance, or unity ( more than one subject) under different light. (color white must be present for White balance).
 Image result for fluorescent light wb
Image result for white balance canon screen 

Monday: 

Update your Photo album with correct numbering and label with descriptions.
#52- AWB under yellow light bulb + observation (0)
#53 -MWB (incandescent) under yellow light bulb + observation. (-1000)
#54 - AWB under LED light + observation (0)
#55 - MWB (fluorescent) under LED light + Observation (+1000)

Image result for white balance canon screen


Wednesday, November 17, 2021

Finish PPT# 5 summary and add illustrations.

 Do now: add photos/ diagram from the internet to each of the topics in CH 3. every slide should have at least one graphics. (Pls sign the attendance sheet and give to the sub.)


Classwork: Slide 10 & 11 (pg 66-71)  finish up ch 3 summary & submit. (remember to add your ISO bracketing compilation to slide 12)

Hw: bring 2 items to photograph tomorrow for White balance test project.

* Sorry I am out today - recovering from booster shot side effects...

Tuesday, November 16, 2021

PPT# 5 - con't with summary

 do now:  what is histogram? what are the 2 kind of exposure meters? email your answers to mcsmphoto@gmail.com

                 subj: AJS11-0_Your name Histogram & meters.(sign the attendance and give to the sub)

Class work: con't with PPT# 5 summary slide 8 & 9 pg 62- 65

Continue to read and summarize ch 3 ( click on the link to read)
https://mcsmphoto.blogspot.com/2015_10_01_archive.html
summarize 2 pages of reading in each slide.

Hw: Look for 2 items to photograph for project 3, one of them needs to be white color.

Monday, November 15, 2021

Mp2 wk# 4: PPT# 5 and Project 3 White balance (planning today)

 Do now: Answer by emailing to mcsmphoto@gmail.com AJS11-0__ your name White balance survey.

Q: What is White balance? from pg 55 how will you stage your next artwork with white balance?


     What type of lighting do you have at home?

***********************************************************************
Classwork / HW:  pg 56-61 (slide 6 & 7)

Continue to read and summarize ch 3 ( click on the link to read)
https://mcsmphoto.blogspot.com/2015_10_01_archive.html
summarize 2 pages of reading in each slide.


Friday, November 12, 2021

Mid- Semester check up

Do now: upload your downloaded ,jpg of #51 - ISO bracketing to your google photo album. and share to mcsmphoto@gmail.com for participation. Remember to number title and describe your observation.

Class work: Grading of Project # 2: Bokeh Portraits

HW: continue to read and summarize CH3 in PPT# 5... Next week: project test # 3 White Balance

Wednesday, November 10, 2021

PPT#5 : Lights and Exposure (notes from ch 3)

 Do now: customize the cover slide for PPT# 5 


Classwork read pg 51-53 and summarize them. don't forget to also add a diagram to each topic.

read and summarize ch 3 ( click on the link to read)
https://mcsmphoto.blogspot.com/2015_10_01_archive.html
summarize 2 pages of reading in each slide.
 > 

HW: catch up if you are not updated.... make your slide for ISO bracketing (slide 12) then download the slide as .jpg to upload to your album as photo# 51

Reminder: Check to see you have updated your album to include your FINAL portraits with proper labeling. We are grading your print out on Project 2 on Friday. Some of you need to retake the portraits... Photo # 45 a b c & # 46 # a b c  (portrait mode). Model a 6 feet away from background! we are dealing with Depth of field (Dof)! https://youtu.be/xhybjeRciYg

Tuesday, November 9, 2021

ISO Bracketing- Testing for the best setting

 do now: Upload yesterday's practice photos to google photo album and write your observation in the descriptions.

Classwork: ISO Bracketing

                   Take in manual mode - keep the aperture & shutter speed the same while you change your ISO from 100 to 6400 on the DSLR. Upload to your PPT# 5 -slide 12 and download as a .JPG to upload to your photo album as photo# 51.

 prepare for PPT# 5 with this slide.

HW: update your Mp2 album


Monday, November 8, 2021

Week # 3: Exposure triangle: Practice photos

Do now: Print out your Project / Test # 2: Bokeh Portraits & make sure your portraits are uploaded for grading.

#45 a b c  & # 46 a b c

***************************************

Classwork: Practice photos for Exposure triangle

email your 2 answers to mcsmphoto@gmail.com AJS11-0__ Your name Exposure triangle is

What is Exposure Triangle? 

https://digital-photography-school.com/the-exposure-triangle-visualised-cheat-sheet/

How can you tell what settings the photos were taken in? (where do you see them?)

*********************************************************************

too lazy to read? watch these videos....

https://petapixel.com/2017/07/12/exposure-triangle-explained-3-animated-videos/

https://www.slideshare.net/srgeorgi/shutter-speed-79917745

HW: Update your Photo album with proper labels.

MP2 album list:

# 31-40 PS# 2: Food diary 

# 41-42 (aperture set) Exposure triangle practice

# 43- 44 Reflector photos

# 45 a b c (control group for Project /Test # 2) which one has the deepest Depth of Field (Dof)?

# 46 a b c (Bokeh Portraits) which one is best for Bokeh?

# 47-48 (Shutter speed set) Exposure triangle practice

# 49-50 (ISO set) Exposure triangle practice


Friday, November 5, 2021

Project Test #2: Bokeh Portraits Q& A

 Do Now: turn in your print out for PS# 2: Food diary... make sure your photos are also uploaded to your MP2 album.

**************************************************************

11-5-21
Class work : Project Test # 2: Bokeh Portraits

 Label all 6 photos taken in your google photo album. and label them with Number, title and descriptions.

Yesterday's HW: take 6 photos from the waist up for headshots with background 6 feet away.
photo 1,2,3 - Control: F/22 simulation (regular camera mode) #45 a b c 
                  change to F/5.6 simulation (portrait mode) 
photographers move back and forth to keep the picture the same for comparison.
4th photo - variable in focal length 18mm(wide angle or .5x -zoom out-) #46a
5th photo - variable in focal length  35mm(no zoom) # 46b
6th photo - variable in focal length 55mm(tele photo or2x -zoom in-) #46c

upload to google photo album to see the EXIF data...
********************************************************************************************************************

Project # 2 write up...in Google doc  https://docs.google.com/document/d/15lSY5D-pjgTl2daEM7tmZvDMu04NcKTX8TAnaeNGL9A/edit?usp=sharing

Write up for Project # 2: Bokeh  effect Portrait  Due Friday 11/5/21 submitted.
based on your 18mm, 35mm, 55mm portraits (6 pictures)
AJS11-0__ Your name Project/Test # 2: Bokeh Portraits (SHARE google doc)
Album link
add the  6 photos with EXIF
EXIF = ISO, F-stop, Shutter speed and focal length
Q & A
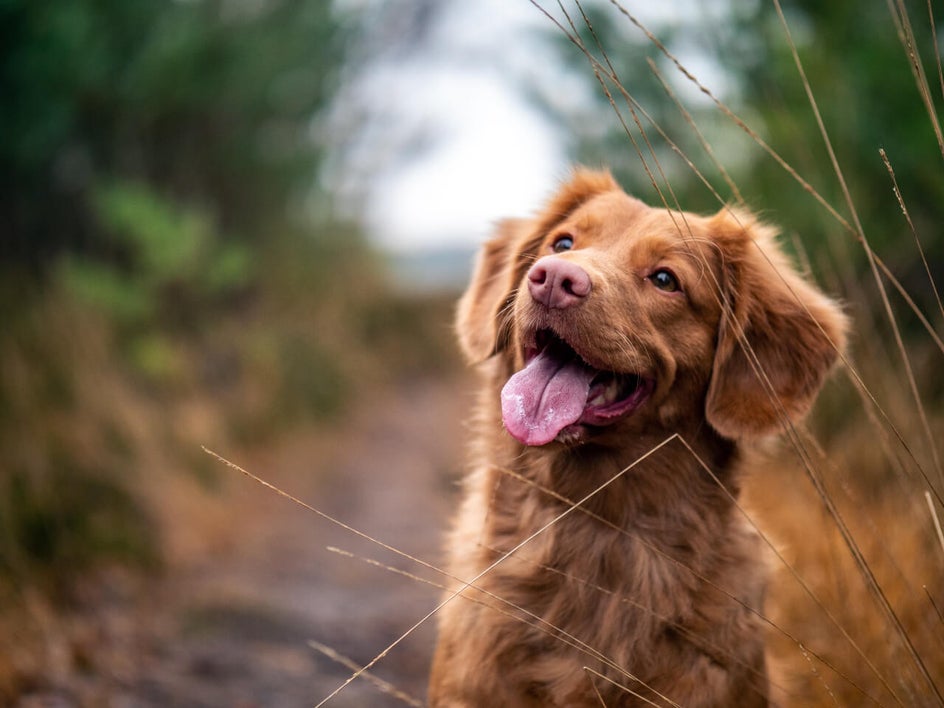
1.Explain how this Bokeh effect Portrait is an art work. What is the message here?
2.Does it contain an element of art? What about its Design principle? (refer to PPT #2)

3.How did you set up the lighting for this photo-shoot?
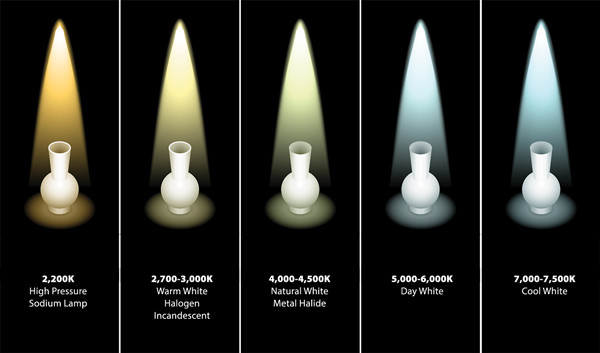
4.What kind of lighting did you use? (refer to PPT # 3)

5.How did you come up with the right setting for this picture? (the exit slip)
6.What was the type of lens used for this project? which focal length was best the Bokeh effect?


7.What did you find / learn from this art Project? 
8.What was your experience like working with a live subject?

extra credit - aperture bracketing...

*******************************************************************
HW: update your MP2 photo album.
# 31-40: PS# 2: Food Diary - a review of art element and design principles.
# 41-42 : Aperture set (Dof =depth of field)
# 43-44: Redirecting light - with and without Reflectors
# 45abc - Deep Dof at different focal length.
# 46 abc - Shallow Dof at different focal length.


Thursday, November 4, 2021

Planning for Project Test 2: Bokeh portraits at home (Q& A tomorrow)

Do now: Print out your Photostory # 2

               before printing... check to see you have the  Qr code & album link.

               story written, and labeled all the photos.... Print on both sides pls. (1 sheet per student) ***************************************************** 

Extra credit: Print out your submission to share with the class.

For Charity: Young photographer          contest... https://i.pinimg.com/originals/06/e1/0c/06e10c55efc54787f84550df3ec7c57c.jpg

Deadline Nov 23, 2021
MY PEACEFUL PLACE: INVESTIN'S YOUNG PHOTOGRAPHER COMPETITION

We’d like you to send us an image that represents your ‘peaceful place’, somewhere you are able to find respite and tranquillity when you’re feeling overwhelmed. Images must be no larger than 1GB and should be submitted with a title and a short caption explaining the image’s significance (no more than 50 words). 
For every entry we’ll make a donation to Stem4, a fantastic charity that works to promote positive mental health in teenagers and those who support them.


*****************************************************************************************************************
Classwork: Worksheet
Bokeh Effect Portraits Due Friday 11-5-21
11-4-21 Tuesday: Proposal and procedure for Project # 2
                   AIM:Which Focal length produces the best Bokeh effect?           

1.who is your model(s)? anybody outside of Photography class _____________________
2.how will you pose your subject? (posing video) take only from chest up "go close" and the background should be at least 5 feet away.
3.where will you be taking the photo? Indoor or outdoor
4.what kind of lighting? __________ reflector needed? Yes or No
5.what is your DSLR setting? what mode will you be shooting in? ____
6.how will you set up for each photo? upload to Google Photo
# 45abc- Control ( all clear and focus) aperture = f/ _____  ( take at 3 focal lengths)
# 46 a Bokeh at 18 mm max aperture= F/ __
# 46 b Bokeh at 35 mm max aperture= F/ __      Common F-stop = _______
# 46 c Bokeh at 55 mm max aperture= F/ __
(move in and out as you adjust the zoom on the lens to keep the subject same size)
#46 d Photoshopped  so its your ART piece. goto Edit and use the photo editor.
Extra credit: https://i.gifer.com/QI10.gif


https://gifer.com/en/QI10
read this before shooting your project https://www.bhphotovideo.com/explora/photography/tips-and-solutions/seven-tips-every-beginning-portrait-photographer-should-know

*****************************************************************************************************************
HW: take 6 photos from the waist up for headshots with background
photo 1,2,3 - Control: F/22 simulation (regular camera mode) #45 a b c 
                  change to F/5.6 simulation (portrait mode) 
photographers move back and forth to keep the picture the same for comparison.
4th photo - variable in focal length 18mm(wide angle or .5x -zoom out-) #46a
5th photo - variable in focal length  35mm(no zoom) # 46b
6th photo - variable in focal length 55mm(tele photo or2x -zoom in-) #46c

upload to google photo album to see the EXIF data...